Computer Tips
Introduction
Welcome to the world's first absolutely free online Computer Tips, Networking Tips and Hardware troubleshooting tips site. Please have a look around, we offer various help Free Tips and PC guide.
SmartDefrag – Free disk defragmenter
( It increase the speed of computer )
When it comes to maintaining a Windows computer, defragmenting the hard driveis one of the most important maintenance tasks. In a nutshell, defragging the hard drive reshuffles and sorts the files in a more practical order for Windows to work with. If you have a messy desk with papers scattered all over the place, finding a particular sheet or document is more time consuming, compared to having everything sorted in an In and Out box.
Traditionally, most average computer users relied on third-party software toschedule and defrag their hard drives. Some more advanced users would use the Task Scheduler and command-line inputs to schedule hard drive defragmentation. Granted, the easiest way to help keep a healthy hard drive was to purchase something like Diskeeper.
Do not get me wrong, Diskeeper is well worth the money, and will help reduce hard drive fragments more efficiently than the built-in Windows utility. The newer versions also defragment your hard drive while your computer is running. You do not have to schedule a specific date and time.
Though it may sound like I am gunning for everyone to run out and buy Diskeeper, I do realize that in today’s economy, most folks want to shave costs where they can. Before you shell out hard cash for that product, take a look at some freeware I recently came across that mimics Diskeeper, to a degree.
The people at IOBit.com were kind enough to release their SmartDefrag product to the world for free. I am guessing that right about now you are asking why choose this over other freeware products or the built-in Windows defrag tool. Well, I will tell you what I know; then you can download and decide if you think it fits your needs. Since it is free, you are not out any money for trying it.
Installation is pretty standard fare. License text, Next, etc etc, Next… If you want to install the Yahoo Toolbar alongside the setup feel free to do so; I skipped that part. Let’s scoot on to the main menu. I will direct your attention first to the left hand side of the main interface.

Here is the quick menu for moving around in SmartDefrag. This provides a nicely arranged listing of the available areas of the program. If we were to go ahead and click on Defrag Now (though it is the default selection), we get the following screen on the right hand side of the SmartDefrag window.

This is a portion for the initial screen. I wanted to point out two things before going further. First, this is the section used to running an immediate hard drive defrag, should you choose to do so. It gives you the option to Defrag Only (not too time consuming), or to Defrag and Optimize (take more time to accomplish). You can also click on Analyze to show an overview of your hard drive’s current level of fragmentation (see below).
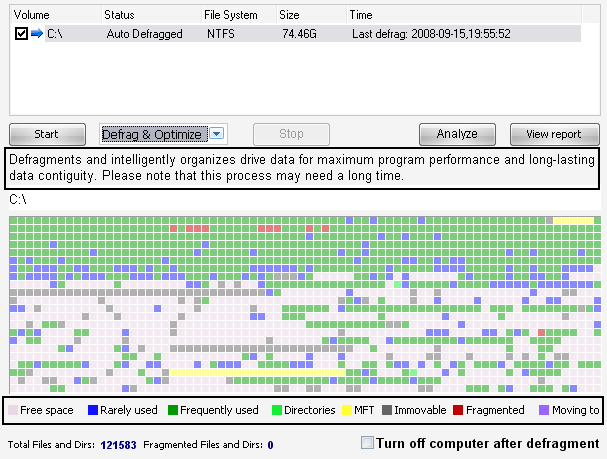
Using the color-based legend, one can get a general idea of their hard drive’s health. Of course the more red you see, well, exactly. Green is good, red is bad. Pressing forward, you may or may not of noticed one small detail. The Auto-Defrag feature has been running since SmartDefrag was installed. Nothing had to be pushed, flipped, or clicked on. However, in the Defrag Now screen, it made a note next to the C:\ drive to this effect. Let’s go on to the Auto Defrag menu to see what it is doing.

Other than showing Disk Usage and CPU Usage, there are only a few options in this menu screen. Of course the most important item is showing a green icon to indicate that Auto Defrag is running. The options here include the ability to turn Auto Defrag on or off, when to not run Auto Defrag, based on resource load, and when to let the service run should your computer be idle for some period of time. Keep in mind that these are just default values, and you use the slider bars to adjust these values higher or lower to your tastes.
Now if you are the type that prefers to keep the lowest load possible on their computer, you may not want Auto Defrag to run (even though it uses very little RAM and CPU). If this sounds like you, you can simply turn the automation off and use the Schedule menu instead.

Here you can choose individual hard drives, should you have more than one. The bottom portion of the menu is where you setup the actual schedule portion. You can choose Defrag Only or Defrag and Optimize. Here is the part that confused me a little bit. Instead of adding their own interface for the Schedule Config button, they made it a front-end for the Windows Task Scheduler.
Granted, the Task Scheduler is not difficult to work with, this is just something that I thought was quirky. In all honesty, a great deal of programs use the Windows Task Scheduler, even though they may have their own specialized shiny menus. SmartDefrag just skips the extra shiny part.

The last menu item is the Options section. Again, we are not inundated with a shopping list of things to choose from. Just a few simple choices comprise the Options menu. Most of them are already turned on, and the default setup is practical with little need to alter the settings, in my opinion.
I would point out that one of the more important items to remember is the "Stop defrag while using battery" option. If you are using this on a laptop, make sure this box is checked. Though SmartDefrag is light on using RAM and CPU time, anything running steadily against a laptop hard drive decreases battery run time.
How does SmartDefrag stack up against Diskeeper? I am not certain, yet. The IOBit website boasts similarity to Diskeeper, without the monetary expenditure. If, performance wise, it comes in fairly close; I would say it is worth saving approximately $50 and not buying Diskeeper. However, the final word will have to come from the individual user, as to determining if SmartDefrag is a good fit for them.
Simple ways to increase your computer’s performace – Stopping the startup programs!
Ohh how I hate it when I start up my computer only to wait 10 minutes while my programs load up: Google Talk, Yahoo Messenger, SnagIT, Google Desktop, my anti-virus program, SQL Server, Java virtual machine, Real Player, QuickTime player, AOL IM, Roxio CD Burning, Windows Defender, Adobe Reader…I think you get my point now…if you have tons of programs loading up that you don’t use anymore, then they are basically doing nothing but slowing your computer down and should be disabled so they don’t load automatically.
If you occasionally use the program, that’s not a problem because when you do decide to use it, clicking on it will load it up. However, all the major software writers like to load themselves up into memory immediately so that in case you use their program, it can load up quickly. This is fine for programs that you use often, but how many times a day to you open QuickTime or Adobe reader? And does 5 extra seconds really matter more than being able to logon quickly!
Disabling startup programs can greatly increase the speed of your computer and usually will not adversely affect your computer because as I mentioned earlier, the programs will be loaded automatically when you click on them. I find this model of load when needed rather than everything being loaded at once to make more sense!
Managing Startup Programs
You can manage your startup programs by going opening the SystemConfiguration Utility. Click on Start and then Run, type in msconfig and click OK.

Click on the Startup tab and you’ll see a list of starup items as shown below:

Note: If you’re running Windows 2000, when you type in msconfig, you’ll get anerror message saying that Windows could not find anything with that name! That is because Microsoft took out the msconfig feature out of Windows 2000 (even though it was in Windows 98) and then after many complaints, put it back into Windows XP!
In order to get it to work on Windows 2000, you need to download the msconfig file and place the file into the C:\WINNT\SYSTEM32\ folder. Here is the link below:
The startup list has two columns: The startup program name and the startupprogram path. This may look a little scary and may seem as if you’ll screw up the computer if you change anything, but don’t be worried. I routinely disable all of my applications without any problems. Remember these are just applications that wereinstalled on your computer, so disabling these programs does not affect the core operating system.
However, you may not want to disable everything; for instance, if you have anti-virus software or Google Desktop running and would like those to run. If you are not able to understand what the program is from the name, try to look at the full path.
As you can see from the list, there is a program named jusched, which makes little sense, but when you look at the path, it is obvious that this is simply the JavaRuntime Environment and can be disabled.
You can also see the item realmon and it’s path reveals that it refers to the eTrustanti-virus program. I would keep this checked to ensure my computer remains protected. If you are running some other anti-virus software such as Norton orMcAfee, you’ll probably see those words in the path.
If you can’t tell what a program is from it’s name or path, then try to disable it and see if it makes any difference once you re-start your computer. Most of the time I have found that these programs do not do anything very useful on the computer.
Click OK and you’ll be asked to restart the computer. When you log in, you should find the logon to be faster depending on how many items you unchecked!
[tags]msconfig, disable startup programs, windows startup apps[/tags]
How to Check if an Email Address is Valid or Not
 Spam filters of popular email services like Gmail,Yahoo are very efficient and they keep a lot of junk emails out of your inbox.Still there are some sophiscated techniques available using which hackers bypass these spam filters.Emails are the prominent method used in phishing scams.
There are various free online services that allows you to send anonymous emails.Hackers can effortlessly create their own Anonymous Email service by simply uploading email PHP script to their servers.If you receive a suspicious email you can check whether that email id exists or it is fake.
Email address Checker is a free third party service. This checking tool connects to the mail server and checks whether the email exists. For valid email addresses, you can view additional intelligence including pictures, blog and local searches.
Spam filters of popular email services like Gmail,Yahoo are very efficient and they keep a lot of junk emails out of your inbox.Still there are some sophiscated techniques available using which hackers bypass these spam filters.Emails are the prominent method used in phishing scams.
There are various free online services that allows you to send anonymous emails.Hackers can effortlessly create their own Anonymous Email service by simply uploading email PHP script to their servers.If you receive a suspicious email you can check whether that email id exists or it is fake.
Email address Checker is a free third party service. This checking tool connects to the mail server and checks whether the email exists. For valid email addresses, you can view additional intelligence including pictures, blog and local searches.
HOW TO VERIFY AN EMAIL ADDRESS IS VALID OR NOT:-
- Just go to the Email address Checker website.
- In the Email Address field give the email address which you want to verify and click on check button.
- In the lower field you will see your result. In this example I had given two email address as you can see there will be a Tick Mark sign which is valid address and there will be a cross sign which is invalid email address.

- For more information about the Email address click on the info button.
 The only limitation of this tool is that you can only check three Email ID’s from one IP Address in a day.


Print Envelopes and Labels in Word
Word provides a suitable way to print envelopes and labels. You can print mailing and return addresses on an envelope, or addresses on a mailing label.
To create and print an envelope, follow these steps.
- Choose Envelopes and Labels from the Tools menu. The Envelopes and Labels dialog box will appear as shown below.
- Click the Envelopes tab to display options of Envelopes.
- Enter (or Edit) the mailing address in the Delivery address box.
- Enter (or Edit) the return address in the Return address box Or select the Omit check box to omit a return address.
- Click Options button to specify the envelope size, the type of paper and other options. Click "Add to Document" button to add or attach the envelope to thecurrent document for later printing or editing.
- Click Print button to print the envelope.
You can also add graphics to the return address of your envelope. To add graphic, follow these steps.
- Select mailing address in the document.
- Open the Envelopes and Labels dialog box.
- Click Add to Document (or Change Document) button.
- Click the Page Layout view icon in the Status bar.
- Insert or create the graphic in the document.
- Position the item on the envelope.
How to apply animation on text or objects in Power Point 2010?
It is very easy to apply animation on text or object in Microsoft Power Point 2010. Animations are applied to emphasize certain things, other objective is to avoid boredom of audience and keep their interest intact through whole presentation. It also helps you to control flow of information, for example if you are explaining a certain point and you do not want your audience to get distract by next points then by help of animation you can stop next points.
You can apply animation on not only text but also on shapes, tables, pictures and other object. The visual effects that are included in Power Point 2010 are exits, entrance, changes in Font Sizes and Colours. You have the option to apply one or multiple animation on one object. Both methods are described below.
Four types of animation effects are available in PowerPoint 2010.
Entrance
Exits
Emphasis
Motion Paths
Applying Single Animation
Instructions:
1. Open your desired Power Point Presentation, to which you want to apply animation.

2. Highlight / Select the text or object you wish to animate'
3. Click on the Animation tab, from “Animation” Group, apply your desired animation.

4. To see more Animation Styles, click Red Highlighted Button

And you will see a range of different animation listed under the categories mentioned above that is Entrance, Exit, Emphasis and Motion Paths. To access detailed animation choose “More” options, as shown in the bottom of the picture.

Applying Multiple Animation to a Text or Object
If you wish to apply “Multiple” animation that is more than one, to a single text then perform steps listed below.
Instructions:
1. Click on the animation tab
2. Under the “Advanced Animation” Group, click on More Animation. A list of Animations will be opened; you can apply your desired one.

zHow to accept Track changes in Microsoft Word 2010?
"Track changes" is wonderful and remarkable tool of Microsoft Word 2010. The feature allows editing your documents without making the changes permanent. It means if you have deleted a word, Track back highlights it, though the word is deleted but until final changes are accepted, it remains there. A track change is very helpful when you are working on draft that needs extra care. For Example you are working your project and you are not sure whether changes you made are right and you want to take your professors/superiors opinion.
Today the world has become global village, now virtual teams sitting in different parts of world are working on same projects. They need to communicate, they suggest prose and finalize things, track changes help them to make changes or send suggestions to other members.
One can delete, add, comment or make formatting changes by using it.
Instructions
1. Open desired word document you wish to apply track changes.
2. Go to Review Tab, under "Tracking" Group, click on track changes. It will change to orange colour, that means feature has "turned on"

3. Take the cursor to where you want to save changes and type, you will see colour of the text will different. It means that changes you are making are not permanent.

4. Go to "Tracking Group" and click on "Show Markup", choose "Balloons" and Click on your desired settings how you want to show your changes. Either you want to show your changes/Revisions in Balloons, with in your document or show only comments and Formatting in Balloons.

5. Go to "Comments" Group, under Review tab, click "New comment" where you want to insert a comment, leave a note or ask question.

6. Go to the Review Group, click on the Reviewing pane and choose either vertical or horizontal settings to carefully go through your document. OR go through them one by one by choosing "Next" or "Previous" from "Changes" Group.

7. Click on "Accept or Reject" from "Changes Group" to tell programme whether you want to keep or permanently delete a change.

Go to the "File Menu" and "Save" all changes that you made in your document.
How to make Greeting Cards with Word 2007?
You can make homemade cards for your friends and family on any occasion if you don't get time to buy cards from the shop. You can make greeting cards with Word 2007. You can make greeting cards with Word 2007 for many occasions and events as well as the Get Well, Friendship cards etc. As you decide to make greeting cards with Word 2007, you can make one card for everyone or a customized one for every individual. You can later print them on a greeting card paper or just the regular one. Follow these steps in order to make greeting cards with Word 2007:
Click on the Office Button from the top left corner.
Click on New. The New Document window will open.

From the list under Templates, click on Greeting Cards.
You can choose the option you want from under the Greeting Cards section.

You will be connected to the Microsoft Office Online site. You can select from hundreds of templates or you can go to this website in the browser and download the templates from there.
You can preview every template in Word and then click the Download button.

The Office Genuine Advantage validation dialog box will appear. You might also have to download the updated version of OGA to be capable of downloading a template.

You can customize the downloaded card by changing the colors, fonts etc or adding your message before printing it.

Now you can print the card.

You can make the holiday card even more personal by adding your own photos to it. You should always have greeting card paper by the side of your printer for ceremonious events.
How to convert word files into PDF?
You can convert your reports, spreadsheets and any word files into Adobe Portable Document Format (.pdf). There are many free and paid software’s available to convert normal files into .pdf, for example you can download “Universal Converter Software” free trail. Using this converter you can convert your web pages, emails, books any others important documents into .pdf.
Benefits of .PDF
PDF files are platforms independent, for example if you are creating your resume in Microsoft windows, and you obviously wants that your resume look the same on all platforms, whether computer has Mac, Linux and Microsoft windows. PDF is the great way to send your important documents to others in same and secure ways.
How To Protecting Document with Password
You can protect your document by applying password so that unauthorized person can not display as well as modify your document. You can apply two types of passwords:
Password to open the document:
If it is applied then you have to give the correct password to open the document, otherwise you cannot open the document.
Password to modify the document:
If it is applied then you have to give the correct password to modify the document, otherwise your document is opened but you cannot modify the document. It means that your document becomes read-only.
To apply a password to document, follow these steps.
* Open Save As dialog box by selecting "Save As" command from File menu.
* Click "Tools" button of Save As dialog box and choose "General Options" from drop down menu, "Save" dialog box appears as shown in figure below.
* Enter first password in "Password to open" text box and second password in "Password to modify" text box (if required) and click "Ok" button of dialog box. Microsoft Word will open "Confirm Password" dialog box for the confirmation of passwords. The maximum length of password is 15 characters.
* Re-enter the password to open and password to modify and click "Ok" button of Confirm Password dialog boxes one by one.
* Click "Save" button of Save As dialog box.
How to access the restricted or banned websites?
You can access the restricted or banned websites with the help of this tip. You may have problems to accessing your favorite's politics, news, and sexy websites in your office and other public places. Some time these websites banned by Government, ISP and may be by your office network administrator. This tip is very useful, if you are using internet particularly in school, college and office.
Follow the given points to access the banned website:
Technique 1: Search the banned website, for examplexcapton.blogspo.com in Google and yahoo search engine then open the cached copy of that page to access the website. You can get also cache link of that website, if you search in Google with keyword cache:URL name and get cache link to access the website.
Technique 2: Another method to access the banned website using its IP address, because you can open the website with IP address instead of actual URL name. This technique bypasses the URL based restrictions. For example if www.myspace.com is banned in your school, you can open it using IP address216.178.32.51. You can search online IP conversion tools to get IP address of any website.
Technique 3: There are some mini web browsers can help you to open the banned websites, for example Opera Mini Browser, install it and try to open any banned website. Another Real Player browser can successfully help you to access the banned website. This Real Player browser bypasses the many restrictions of website banned tools.
Technique 4: There any many websites Anonymizer tools are available to fetch the banned website. These anonymous surfing tools that protect your identity on the internet and give the access to banned sites. As far as the service provider is concerned you are viewing a page from Anonymizer and not the blocked site.
These tips are very useful to access the banned websites in your university, cybercaf� ,office and other public places.
How to create a auto summary of a Word 2007 document?
It is a time-consuming task to create a summary of a lengthy Word document. Among the many useful features of Word 2007 is the AutoSummary Tool to create a summary of a Word 2007 document. It gives scores to the sentences consisting of words which are repeatedly used. The sentences which score the maximum points are used to create a summary of a Word 2007 document. You can also utilize the Auto function to create a summary of a Word 2007 document.
You have to start by adding the AutoSummary Tools to the quick access bar. This is how you will achieve that:
Click on the Office Button on the top left corner.
Click on the Word options button at the bottom of the menu

Select Customize from the left hand side of the dialog box that appears.
Select All Commands from the drop-down menu of Choose commands from and scroll down to select the AutoSummary Tools.
Click on the Add button in the middle.
Click on the OK button.

The AutoSummarize icon will now appear on the quick access bar.
In order to create the summary, follow these steps:
Click on the AutoSummarize button from the quick access toolbar and select AutoSummarize from the menu.

The AutoSummarize dialog box will appear. Select from among the four given options.

Click on the OK button.
The option Highlight key points can be used to get the words as well as phrases which are frequently used. You can then create the summary by yourself.

If you choose one of the other three options, Word 2007 will auto generate a summary which can be put on the top of the document, on a new page or just display the summary and hide the rest of the document depending on the option you choose.

How to improve your Wireless internet and network connection?
Microsoft Windows gives you a notification whenever your wireless network has a weak signal. This is a sign that you should improve your wireless network. When you get this notification, it means that the wireless connection is not as reliable or high-speed as it's supposed to be. In fact, the wireless connection signal may be completely lost in certain areas of the house. If you would like to improve your wireless network signal, you should carry out a few of these tips. These tips will extend the wireless range. They will also improve the overall performance as well as reliability of the wireless network.
Re-position the wireless router (or wireless access point) to the centre of the house.

Place the router away from walls.
Place the router off the floor.
Place the router away from metal objects.
Instead of using a standard antenna which you get with the router, use a hi-gain one. If the standard router is placed by an outer wall, part of the wireless signals will be directed outside the house. This will also waste the power of the router. Hi-gain antennas send the wireless signals in a single specific direction which you are able to aim on the path where you need them a large amount.

Replace your laptop or computer's wireless network adapter with a USB network adaptor. It uses an external antenna that improves the range of the signals. (Laptops which have built-in wireless normally contain outstanding antennas. They do not usually require to be upgraded.)
Add a wireless repeater to extend the signal range.

Change the wireless router's channel to increase the strength of its signal. You can do that through the configuration page of the router. The computer will detect the new channel itself.

Reduce wireless interference by avoiding wireless electronics which use the 2.4GHz frequency. You should use cordless phones which use the 900MHz or 5.8GHz frequencies.
Update your firmware updates for your router through the manufacturer's website. Update your network adapter driver through the Windows Update feature of Windows 7 and Vista or visit the website www.update.microsoft.com for Windows XP.
Upgrade 802.11b devices to 802.11g or buy a new 802.11 g equipment. It is five times faster than an 802.11b device.
How to Secure a Wireless Network from Hackers?
The reason we secure a wireless network is to stop people from using the services of our network who don't have permission to utilize them. It is harder to secure a wireless network from hackers as compared to a classic wired network. This is due to the fact that a wireless network can be accessed anywhere inside the range of its antenna.
In order to secure a wireless network from hackers, we should take proper steps to save ourselves against security issues. If you don't secure a wireless network from hackers, you might end up without its service. The consequence might also include the utilization of our network to attack further networks. To secure a wireless network from hackers, you should follow these simple wireless networking tips:
1. Strategic antenna placement:
The first thing you have to do is to position the access point's antenna in a place which restricts the range of its signal to go further than the required area. You should not put the antenna close to a window because glass can't obstruct its signals. Place it in a central location of the building.
Use WEP:
WEP stands for Wireless encryption protocol. It's a customary technique for encrypting traffic on a wireless network. You should never skip it as that will allow hackers to get instant access to the traffic over a wireless network.
3. Change the SSID, disable the broadcast of SSID:
SSID stands for service set identifier. It is the recognition thread utilized by the wireless access point due to which the customers are capable of starting connections. For every wireless access point arranged, select an exclusive as well as unique SSID. Also, if it's attainable, hold back the broadcast of the SSID out over the antenna. It won\t appear in the listing of offered networks, while being able to provide services as usual.
4. Disable DHCP:
By doing this, the hackers will have to decode the TCP/IP parameters, subnet mask as well as the IP address in order to hack your wireless network.
5. Disable or modify SNMP settings:
Change the private as well as public community settings of SNMP. You can also just disable it. Otherwise the hackers will be able to utilize SNMP to get significant info regarding your wireless network.
6. Utilize access lists:
For additional security of your wireless network, and if your access point support this feature, employ an access list. An access list lets us determine precisely which machinery is permitted to attach to an access point. The access points which include the access list can employ trivial file transfer protocol (TFTP) now and then in order to download modernized lists to steer clear of hackers. How to Record Narration for Microsoft PowerPoint Presentation 2010?
Microsoft PowerPoint is used for normally presenting complex data in graphical form, with the help of charts, graphs. There are various helpful tools in Microsoft PowerPoint2010; there is one in particular that is also very handy. If you want to add narration that is voice over to your presentation, that can be beneficial for various purposes. You can do that by doing few simple steps, please read step by step guide below.
Note: Make sure microphone is working properly. If you do not have built in microphone, please make sure that plug is secure.
Instructions:
From the “Start” Menu, click on “All Programs” option and Select “Microsoft PowerPoint 2010”. Either browse an existing file or complete the new one.Go to “Slide Show” tab and look for “Record Slide Show” under “Set Up” subgroup.

Choose entire slide or select the Slide where you want Audio “Narration” to begin, from “Record Slide Show” options to add narration.

Select “Narration and Laser Pointer” check box when Record Slide Show box appears.

Click “Start Recording” button and speak clearly into the microphone. If you need to stop in between click on “Pause” and “Resume” buttons.
Right-click the slide, and then click "End Show" to end the slide show recording.

Audio Narration has been added to your slides successfully.
How to use Bluetooth technology to connect laptop and cell phone?
We can use Bluetooth technology to connect laptop and cell phone. We can move videos, images, photos etc from desktop computer or a laptop to our cell phones. In order to use Bluetooth technology to connect laptop and cell phone we need a laptop and a cell phone which support this technology. Try webhosting
If the laptop doesn't support it, we can use a USB Bluetooth dongle. Just plug it into the USB port of the desktop computer or laptop. Leave the rest to Microsoft Windows. It will find the driver and install it itself. If it is not supported, we can manually install it via the manufacturer's compact disk. Follow these simple steps in order to use Bluetooth technology to connect laptop and cell phone: (In this example, we are using Windows Vista.)
Turn on the Bluetooth feature on your cell phone.
Make this setting: my Phone's visibility -> Shown to all on the cell phone.
Open Bluetooth Devices by clicking on its icon in the Control Panel.

OR
Look for the Bluetooth driver in the Device Manager and double-click on its icon.

Click on the Add button in Bluetooth Devices dialog box.

Check the box for "My devices is set up and ready to be found" in the Add Bluetooth Device Wizard dialog box.
Click on the Next button.

This device wizard will display the name of the found Bluetooth device close by.
Click on the device name that you would like to add and click on Next.

Select "Let me choose my own key" or "Choose a passkey for me" and click on Next.

It will now display the passkey. Key this into the cell phone. Now the laptop is initiating to install the Bluetooth device. (Click Yes as you see the prompt message on the cell phone to allow connection with the laptop.)

Click on the Finish button to close the dialog box of Add Bluetooth Device Wizard.

The Bluetooth device (the cell phone) is now displayed in Bluetooth Devices dialog box. Select the Bluetooth device and click on the Properties button.

The Properties dialog box for the device will become visible. Choose the Services tab.
Check the boxes for the services you want.

In the end you can launch the items of the cell phone. Transfer photos, videos etc to cell phone via Bluetooth technology.

How to create a shortcut for locking the Computer Screen in Windows 7?
There are many ways in which you can lock the computer screen. The most popular as well as the fastest way to lock it is to use a keyboard shortcut. The keyboard shortcut used to lock the computer screen is Win+L. A few of us choose to utilize the mouse to lock it. And of course many people like to use both the options.
There is another method in which we can lock the computer screen. It is to create a shortcut for locking the computer screen in Windows 7. You can create a shortcut for locking the computer screen in Windows 7, XP and Vista too. Follow these steps in order to create a shortcut for locking the computer screen in Windows 7 as well as other editions:
Right-click on the desktop where you would like to create the shortcut.
Point to New.
Click on Shortcut from the menu.

Type in this text in the shortcut textbox. (This text will work for Windows XP as well even though the screen will be different)
rundll32.exe user32.dll, LockWorkStation

Click on the Next button.
Type in a name for your shortcut.
Click on the Finish button.
You have successfully created a shortcut to lock your workstation. Just click on the shortcut whenever you want to lock the computer screen.
COMPUTER COOLING TIPS – COOL DOWN YOUR HOT RUNNING COMPUTER
IT IS COOL TO SEE HOT BABES RUNNING AROUND, BUT IT WILL BE A DISASTER IF YOU HAVE A HOT COMPUTER RUNNING ON YOUR DESK. AFTER INVESTING ALL YOUR POCKET MONEY ON YOUR IDEAL GAMING COMPUTER, THE LAST THING THAT YOU WANT TO SEE IS ALL YOUR GAMING HARDWARE BURNING UP IN FLAMES.
OVERHEATING IS THE MOST COMMON PROBLEM FACED BY GAMERS. A GAMING COMPUTER RUNNING GRAPHICS INTENSIVE 3D GAMES FOR 5-8 HOURS CONTINUOUSLY CAN GENERATE HEAT WITH TEMPERATURE HIGH ENOUGH TO BOIL WATER. IF NO PROPER COOLING IS DONE TO DISSIPATE THE HEAT, CHANCES ARE THAT YOUR GAMING COMPUTER WILL GET DAMAGES BEYOND REPAIR VERY SOON.
FIRST LINE OF DEFENCE – COOL YOUR CPU
WITH THE ENORMOUS AMOUNT OF CALCUATION THAT IT HAS TO DO EVERY MICROSECOND, IT IS NO SURPRISE THAT THE CPU IS THE MOST LIKELY CANDIDATE TO GET OVERHEATED. IN FACT, IT IS ALSO THE COMPUTER PART THAT GENERATED THE MOST HEAT.

A CPU HEATSINK WITH FAN
THE WAY TO COOL YOUR CPU IS TO USE A HEATSINK. THE HEATSINK IS A BIG SOLID PIECE OF METAL THAT IS ATTACHED TO THE SURFACE OF THE CPU (SEE LEFT DIAGRAM). IT HAS LARGE PARALLEL FINS LINING ON ITS SURFACE TO CONDUCT HEAT AWAY FROM THE CPU. HEATSINK IS USUALLY MADE OF ALUMINIUM MATERIAL DUE TO ITS HIGH THERMAL CONDUCTIVITY AND INEXPENSIVE PRICE.
THE HEATSINK IS USUALLY INCLUDED IN THE PACKAGE WHEN YOU BUY A BOXED CPU. FOR OEM CPU, YOU HAVE TO GET THE HEATSINK SEPARATELY. CONVENTIONALLY, ALL THE FINS ON THE HEATSINK ARE LINED IN A SINGLE DIRECTION. THE PROBLEM WITH THIS DESIGN IS THAT AIR CAN ONLY MOVE THROUGH THE FINS IN A SINGLE DIRECTION, CREATING A PROBLEM OF AIR FLOW WITHIN THE COMPUTER CASE. A NEWER DESIGN WHICH HAS MULTIPLE THREADS RUNNING ON THE FINS SURFACE HAS GREATLY IMPROVED THE EFFICIENCY OF THE HEATSINK.
PLACING THE HEATSINK
WHEN PLACING THE HEATSINK, IT IS IMPORTANT TO SEAT IT PROPERLY ON THE CPU. ANY MISPLACEMENT OR GAPS BETWEEN THE CPU AND HEATSINK ALLOW THE CPU TO BE OVERHEATED. TO FURTHER IMPROVE THE THERMAL CONDUCTIVITY, SOME GAMERS INSERT A THIN COPPER HEAT SPREADER BETWEEN THE CPU AND THE HEATSINK. THOUGH IT IS NOT A ‘MUST-HAVE’ COMPONENT, IT DOES HELP IN DISSIPATING THE HEAT AWAY.
APPLYING THE THERMAL GREASE


ANOTHER IMPORTANT ITEM IS THE THERMAL GREASE (SOME CALL IT THE THERMAL PASTE). DUE TO ITS HIGH THERMAL CONDUCTIVITY AND LOW RESISTANCE, THERMAL GREASE IS ESSENTIAL TO PROPER CPU COOLING. IT IS A MUST TO APPLY THERMAL GREASE ON THE SURFACE OF THE CPU BEFORE SEATING THE HEATSINK ON IT. WITHOUT THE THERMAL GREASE, EVEN THE BEST HEATSINK WILL FAIL TO WORK PROPERLY. FOR MAXIMUM EFFICIENCY, THE THERMAL GREASE MUST BE APPLIED IN A VERY THIN AND EVEN FILM. CARE MUST ALSO BE TAKEN NOT TO APPLY TOO MUCH ON THE CPU AS IT CAN HINDER THE PERFORMANCE OF THE HEATSINK.
FUNCTION OF THE CPU COOLING FAN?
HEATSINK CAN ONLY TRANSFER HEAT FROM THE CPU TO ITS METAL FINS. TO DISSIPATE THE HEAT AWAY FROM ITS METAL SURFACE, IT NEEDS A CONTINUOUS STREAM OF MOVING AIR TO CARRY THE HEAT AWAY. THIS IS WHERE THE CPU COOLING FAN COMES INTO PLAY. ATTACHED TO THE TOP OF THE HEATSINK, THE CPU COOLING FAN SUCKS THE HOT AIR OUT FROM THE HEATSINK AND BLOWS A CONSTANT STREAM OF COOL AIR TO THE FINS. INTERNALLY CONTROLLED BY THE MOTHERBOARD, THE FAN CAN INCREASE ITS SPEED WHEN THE CPU TEMPERATURE GETS TOO HIGH.
DIFFERENT TYPE OF CPU HAS DIFFERENT MOUNTING CONFIGURATION FOR ITS COOLING FAN. THEREFORE, WHEN CHOOSING A CPU COOLING FAN, ENSURE THAT IT IS COMPATIBLE WITH THE CPU IN YOUR COMPUTER.
A CPU HEATSINK WITH FAN
COMPUTER COOLING TIPS PART 2 – RAM AND HARD DRIVE COOLING
PROTECTING THE RAM
THE RAM CAN GET VERY HOT WHEN IT IS LOADED WITH HEAVY APPLICATION. THIS IS ESPECIALLY TRUE WHEN INSUFFICIENT MEMORIES ARE INSTALLED IN YOUR COMPUTER. OVERHEATING ALSO OCCUR WHEN YOU OVERCLOCK THE RAM. WHEN THE RAM OVERHEATS, YOU WILL START TO EXPERIENCE HANGING SCREEN, SUDDEN BLACKOUT OR THE FAMOUS WINDOWS BLUE ERROR SCREEN. WHATEVER IT IS, IT IS DEFINITELY NOT A GOOD EXPERIENCE.
NEVERTHELESS, IT IS EASY TO PROTECT THE RAM. A RAM COOLER WILL USUALLY DO THE TRICK. THE RAM COOLER IS A SIMPLE METAL HOUSING FOR THE RAM. THE METAL SURFACE IS IN CONTACT WITH THE CHIPS ON THE RAM MODULE TO EFFECTIVELY DISSIPATE HEAT AWAY. IT IS SOLD RATHER CHEAPLY IN THE MAJOR COMPUTER RETAIL STORE, WITH PRICE RANGING FROM $3.99 TO $19.99 INTIGERDIRECT .
DIFFERENT TYPES OF RAM COOLER
.
DIFFERENT TYPES OF RAM COOLER


THE CONVENTIONAL RAM COOLER RAM COOLER WITH EXTRA FANS RAM COOLER THAT USES LIQUID COOLING TECHNOLOGY
IF YOU REQUIRE A MORE EFFICIENT COOLER TO COOL YOUR RAM, THERE ARE COOLERS WITH A BUILT IN FAN TO INCREASE THE AIRFLOW AND DISSIPATE HEAT AWAY FROM THE RAM.


HARD DRIVE OVERHEATING IS NEVER AN ISSUE IN THE PAST. THIS IS BECAUSE HARD DRIVE TRANSFER RATE IS NOT AS FAST AND THE DISK SPINNING SPEED IS RELATIVELY SLOW. HOWEVER, THINGS HAVE CHANGED. WITH THE HARD DRIVE NOW SPINNING AT FAST AS 7200RPM, COOLING HAS BECOME AN IMPORTANT ISSUE.
WHEN A HARD DRIVE IS OVERHEATED, ITS PERFORMANCE WILL NOT BE AFFECTED. THIS MEANS THAT IT WILL NOT SPIN SLOWER OR TRANSFER AT A LOWER RATE JUST BECAUSE IT IS TOO HOT. HOWEVER, OVERHEATING WILL REDUCE THE LIFESPAN OF THE HARD DRIVE AND WILL BECOME LESS RELIABLE IN THE LONG RUN.
THE BEST WAY TO COOL DOWN A HARD DRIVE IS TO USE A HARD DRIVE COOLER. IT CONSISTS OF A METAL CASING TO FIX ON THE HARD DRIVE WITH EMBEDDED FAN TO COOL DOWN THE UNIT.
SOME ADVANCED HARD DRIVE COOLERS COME WITH EXTRA HEAT SINK TO HELP LOWER THE TEMPERATURE. THESE ARE USEFUL IF YOUR HARD DRIVE GETS OVERHEATED EASILY.
COMPUTER COOLING TIPS PART 3 – CASE COOLING
WHAT’S NEXT? – CASE COOLING
CASE COOLING IS THE NEXT IMPORTANT THING OF THE WHOLE COOLING PROCESS. WITH ALL THE HEAT PILING UP INSIDE THE COMPUTER CASE, THERE IS A NEED TO PURGE THE HOT AIR OUT AND REPLACED IT WITH COOL AIR.
CASE COOLING INVOLVES MORE THAN JUST ADDING COOLING FANS. IT REQUIRES CAREFUL PLANNING AND PAYING ATTENTION TO SMALL DETAILS. HERE ARE SOME USEFUL WAYS TO COOL YOUR COMPUTER CASE.
- TIDY UP YOUR WIRES
REMOVE ANY UNUSED WIRES AND CABLE INSIDE YOUR COMPUTER CASE. FOR WIRES AND CABLES THAT ARE TOO LONG, USE A CABLE TIE TO TIE THEM UP. ENSURE THAT THE WIRES AND CABLES DO NOT BLOCK THE FANS AND THE WAY OF AIRFLOW. IF THEY DO, RE-ROUTE THEM TO PROVIDE A CLEAR PATH FOR THE COOLING FANS. IDE CABLE IS USUALLY BIG IN SURFACE AREA AND TAKES UP LOT OF SPACE. IF POSSIBLE, CHANGE YOUR HARD DRIVE INTERFACES TO SATA. THIS CAN BE EASILY DONE BY UPGRADING TO A SATA HARD DRIVE OR USE A SATA ADAPTOR .
.
- COOLING FANS
MOST COMPUTER CASES COME WITH TWO COOLING FANS, ONE AT THE FRONT AND ONE AT THE REAR OF THE POWER SUPPLY. THE USUAL WAY IS TO DIRECT COOL AIR IN FROM THE FRONT AND HOT AIR OUT FROM THE REAR. FOR NORMAL USAGE, THE TWO FANS ARE SUFFICIENT, BUT FOR GAMING, HEAT BUILD UP MUCH FASTER AND ADDITIONAL FANS ARE NEEDED TO IMPROVE THE AIRFLOW. WHEN PLACING THE ADDITIONAL FANS, IT MUST BE PLACED EITHER IN THE FRONT TO BLOW COOL AIR IN OR AT THE REAR TO DIRECT HOT AIR OUT. SINCE HOT AIR RISES, IT IS IMPORTANT FOR A GAMING COMPUTER CASE TO HAVE A LARGE AIR INTAKE IN THE LOW FRONT OF THE CASE AND POWERFUL FANS BLOWING OUT FROM THE TOP REAR OF THE CASE (SEE DIAGRAM).

WHEN CHOOSING A CASE COOLING FAN, IT IS ADVISABLE TO CHOOSE A 120MM FAN OVER AN 80MM FAN. 120MM FAN MOVE A LARGE VOLUME OF AIR AND PRODUCES LESS NOISE. AN 80MM FAN WILL BE USEFUL IF YOU ARE MOUNTING IT AT THE SIDE PANEL FOR ADDITIONAL COOLING.
- CASE FAN CONTROLLER
A CASE FAN CONTROLLER WORKS BY MEASURING THE TEMPERATURE OF YOUR CASE INTERIOR AND ALLOW YOU TO CONTROL THE FAN SPEED WHEN IT GETS TOO HOT. ALTHOUGH NOT A ‘MUST-HAVE’ ITEM, IT DOES COME IN HANDY AND GIVING YOU MORE CONTROL OVER YOUR GAMING COMPUTER.
- REGULAR MAINTENANCE AND CLEANING – KEEP THE DUST OUT
YOU CAN’T SEE IT, BUT IT IS THERE. WHAT I AM REFERRING TO IS THE DUST PARTICLES THAT ARE QUIETLY GATHERING IN EVERY PART OF YOUR COMPUTER. THESE DUST PARTICLES SEEM TO HAVE A MISSION ON HAND – TO CLOG UP YOUR FAN MOTOR AND OBSTRUCT THE AIR FROM FLOWING THROUGH. THE WAY TO COMBAT THESE DUST PARTICLES IS TO REGULARLY CLEAN UP YOUR COMPUTER. SCHEDULE A TWO HOUR SESSION EVERY TWO WEEKS TO MAINTAIN YOUR COMPUTER. OPEN UP THE SIDE PANEL OF THE COMPUTER CASE. USE A CAN OF COMPRESSED AIR TO BLOW AIR AROUND ALL THE COMPUTER PARTS, GIVING EXTRA ATTENTION TO THE CPU (HEATSINK AND FAN), GRAPHICS CARD GPU (HEATSINK AND FAN), RAM MODULE AND POWER SUPPLY FAN. BE CAREFUL TO KEEP THE NOZZLE FOUR INCHES AWAY FROM THE MACHINE, AS GREAT PRESSURE FROM THE COMPRESSED AIR COULD DAMAGE THE COMPONENTS. IF YOU FIND THAT THE EXPANSION CARDS ARE EXCEPTIONALLY DIRTY, REMOVE EACH CARD AND CLEAN ITS CONTACTS WITH ISOPROPYL ALCOHOL. LASTLY, USE ANTISTATIC WIPES TO CLEAN UP THE DUST INSIDE THE CASE, PARTICULARLY THE AREA WHERE AIR FLOWS IN AND OUT (AROUND THE CASE COOLING FAN AREA).
COMPUTER COOLING TIPS PART 4 – COMPUTER MOTHERBOARD MONITORING SOFTWARE
COMPUTER MOTHERBOARD MONITORING SOFTWARESOMETIME, IT PAYS TO BE EXTRA CAREFUL. YOU CAN MAKE USE OF THIS COMPUTER MOTHERBOARD MONITORING SOFTWARE TO FIND OUT IF YOUR GAMING COMPUTER IS TOO HOT. MOTHERBOARD MONITOR MONITORS AND REPORTS THE TEMPERATURE INSIDE YOUR COMPUTER CASE. WHEN YOUR COMPUTER PARTS REACH A CRITICAL TEMPERATURE, IT WILL ALARM YOU AND AUTOMATICALLY SHUT DOWN YOUR COMPUTER BEFORE ANYTHING GETS DAMAGED. ELSE, IT WILL JUST QUIETLY SIT IN THE SYSTEM TRAY OF YOUR DESKTOP.THIS SOFTWARE DOES NOT WORK WITH ALL MOTHERBOARDS, BUT FOR THOSE THAT WORK; THIS IS A USEFUL SOFTWARE FOR ANYONE WHO IS CONCERNED ABOUT THE HEALTH OF THEIR COMPUTER. DOWNLOAD MOTHERBOARD MONITOR HERE.


FINAL WORDS
THERE IS NO BETTER WAY TO DAMAGE YOUR GAMING COMPUTER THAN SEEING IT BURNING UP IN FLAMES. COOLING IT DOWN IS THE ONLY WAY TO SAVE YOUR COMPUTER. WITH AN EFFICIENT COOLING STRATEGY AND SOME EFFORT TO MAINTAIN IT, YOU CAN HAVE A PEACEFUL MIND TO PLAY YOUR GAME WITH THE TOP QUALITY.
NEVERTHELESS, IT IS EASY TO PROTECT THE RAM. A RAM COOLER WILL USUALLY DO THE TRICK. THE RAM COOLER IS A SIMPLE METAL HOUSING FOR THE RAM. THE METAL SURFACE IS IN CONTACT WITH THE CHIPS ON THE RAM MODULE TO EFFECTIVELY DISSIPATE HEAT AWAY. IT IS SOLD RATHER CHEAPLY IN THE MAJOR COMPUTER RETAIL STORE, WITH PRICE RANGING FROM $3.99 TO $19.99 INTIGERDIRECT
|
COMPUTER COOLING TIPS PART 4 – COMPUTER MOTHERBOARD MONITORING SOFTWARE
COMPUTER MOTHERBOARD MONITORING SOFTWARESOMETIME, IT PAYS TO BE EXTRA CAREFUL. YOU CAN MAKE USE OF THIS COMPUTER MOTHERBOARD MONITORING SOFTWARE TO FIND OUT IF YOUR GAMING COMPUTER IS TOO HOT. MOTHERBOARD MONITOR MONITORS AND REPORTS THE TEMPERATURE INSIDE YOUR COMPUTER CASE. WHEN YOUR COMPUTER PARTS REACH A CRITICAL TEMPERATURE, IT WILL ALARM YOU AND AUTOMATICALLY SHUT DOWN YOUR COMPUTER BEFORE ANYTHING GETS DAMAGED. ELSE, IT WILL JUST QUIETLY SIT IN THE SYSTEM TRAY OF YOUR DESKTOP.THIS SOFTWARE DOES NOT WORK WITH ALL MOTHERBOARDS, BUT FOR THOSE THAT WORK; THIS IS A USEFUL SOFTWARE FOR ANYONE WHO IS CONCERNED ABOUT THE HEALTH OF THEIR COMPUTER. DOWNLOAD MOTHERBOARD MONITOR HERE.
FINAL WORDS
THERE IS NO BETTER WAY TO DAMAGE YOUR GAMING COMPUTER THAN SEEING IT BURNING UP IN FLAMES. COOLING IT DOWN IS THE ONLY WAY TO SAVE YOUR COMPUTER. WITH AN EFFICIENT COOLING STRATEGY AND SOME EFFORT TO MAINTAIN IT, YOU CAN HAVE A PEACEFUL MIND TO PLAY YOUR GAME WITH THE TOP QUALITY.
No comments:
Post a Comment